My First Client Widget
This tutorial is an introduction to Alkami’s widget template. A widget is an MVC application that plugs into the base Alkami platform.
Alkami’s Widget Platform
Section titled “Alkami’s Widget Platform”The Alkami platform is a web-based application that is extended and customized with plugins called widgets. Users can use these widgets to access their banking details with a customized desktop and mobile experience. This tutorial will guide you from project creation with a Visual Studio template to deploying a fully working widget with desktop and mobile views.
Create and Build
Section titled “Create and Build”-
Upgrade to the latest version of SDK Templates by running this command in Powershell
Terminal window choco install Alkami.SDK.Templates -y -
Open Visual Studio
Create a new project and select Alkami Client Widget Template
-
In Project name, type USBFI.Client.Widget.FirstWidget
In the New Client Widget Box, we’ll enter in these information:
Widget Display Settings:
AllWidget Icon:
PiggyBank Identifier:
78554577-9DE6-43CD-9085-5868977156D1(This bank identifier is the default one for Developer Dynamic)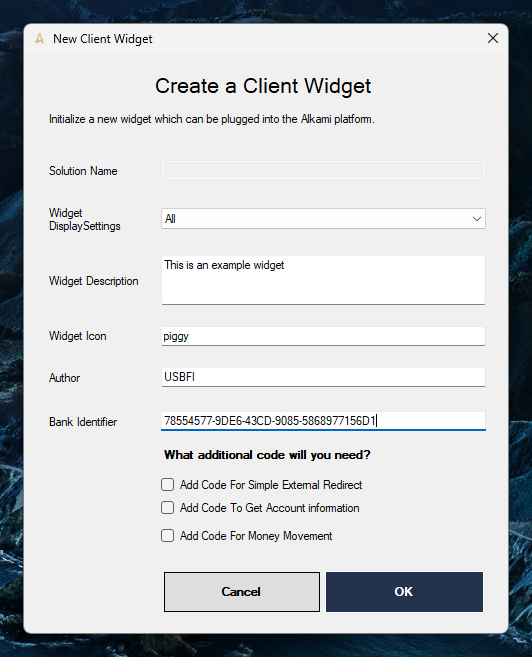
-
Build the solution and verify it succeeeds
-
Go to https://developer.dev.alkamitech.com and Login with
mike.brady.The password will be
12345and the OTP is560142 -
In the URL, replace DashboardV2 with the areaname of your widget, such as USBFIMyMoney. Your widget opens on the page.
Configure the Widget
Section titled “Configure the Widget”Each widget needs a database entry for it to be loaded during platform startup.
This process happens automatically during project creation. However for rare occasions where it doesn’t, you will need to go Tools/ folder and run install_widget.sql
Verify the db entry exists by querying Core.Widget table.