My First Microservice
This tutorial describes what a configurable provider service (microservice) is and how to create a service from the Alkami template. We will do the following:
-
Build and configure the template service.
-
Test and debug the example service implementation.
-
Add new settings and a new contract method that will fetch and use those settings.
-
Create a new feature for this example and equip it with new request and response objects.
-
Create object models to store the request and response data with data validations that confirm our request data is valid.
-
Implement the new feature logic.
-
Use the Micros Service Tester to test.
Provider-based Services
Section titled “Provider-based Services”Developers use provider-based services to define configurable settings for use in the service implementation.
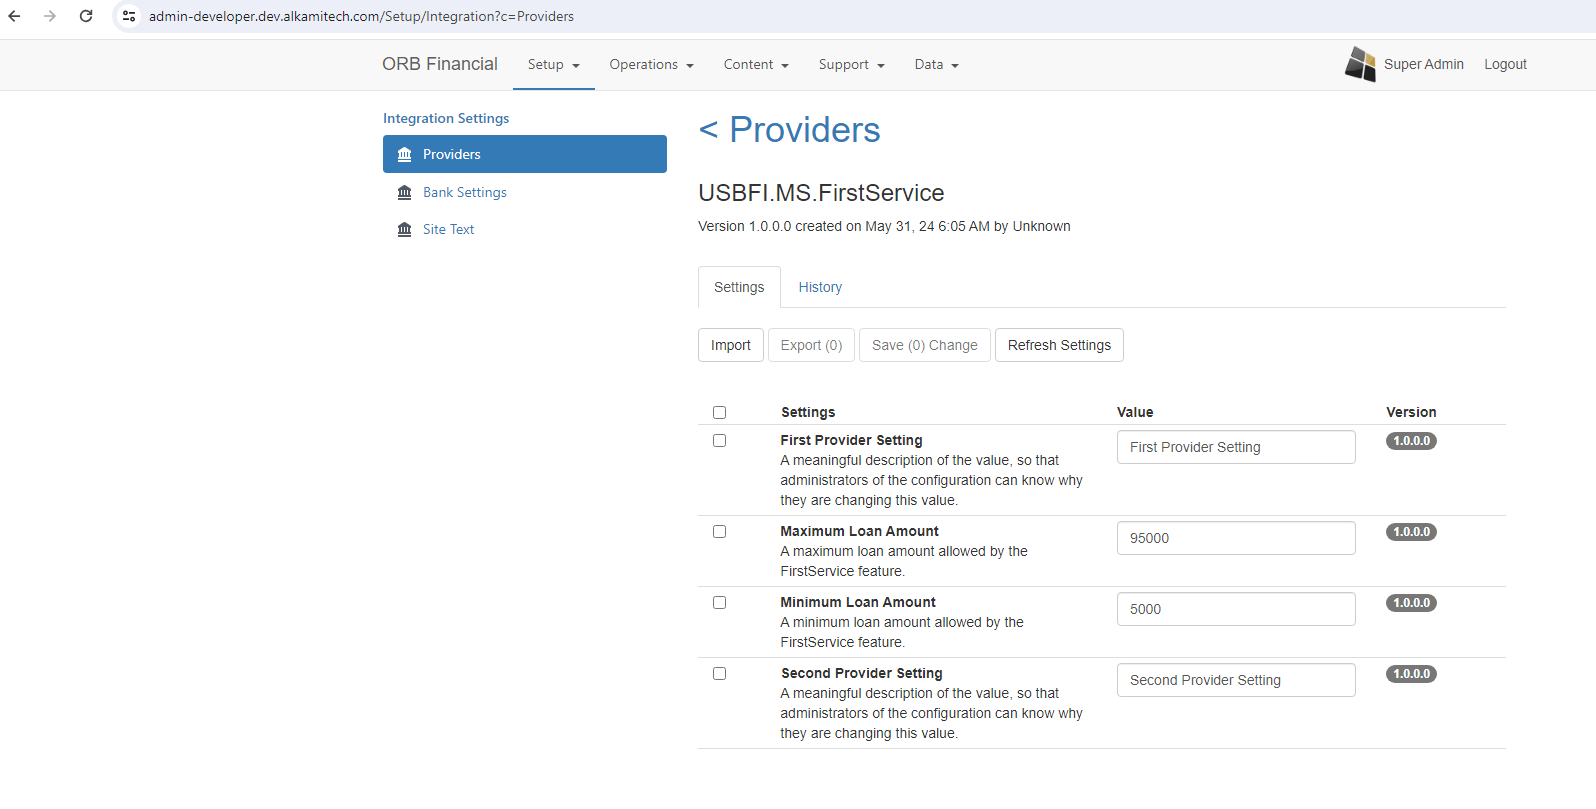
Use Alkami’s Admin Portal to manage these settings.
To do this, go to Setup > Integration Settings and click Providers.
The Alkami Provider Service Template
Section titled “The Alkami Provider Service Template”The SDK template creates a structured Visual Studio solution that contains all the projects and implementation details to run the service. The service can be built and run out-of-the-box and contains an easy-to-follow implementation of a single public method. The example code is commented and lays down a request and response pattern to follow when adding additional contract methods.
Install the Template
Section titled “Install the Template”Run the following command:
choco install Alkami.SDK.Templates -y
Create the Service
Section titled “Create the Service”Alkami’s SDK template creates a structured Visual Studio solution that contains all the projects and implementation required to run a service with a single public contract method. The example code adheres to Alkami’s preferred request and response pattern so you can take advantage of the Validation framework.
-
Open Visual Studio and search
alkamito filter for Alkami templates.Note: Your version of Visual Studio might look different than the following screenshots.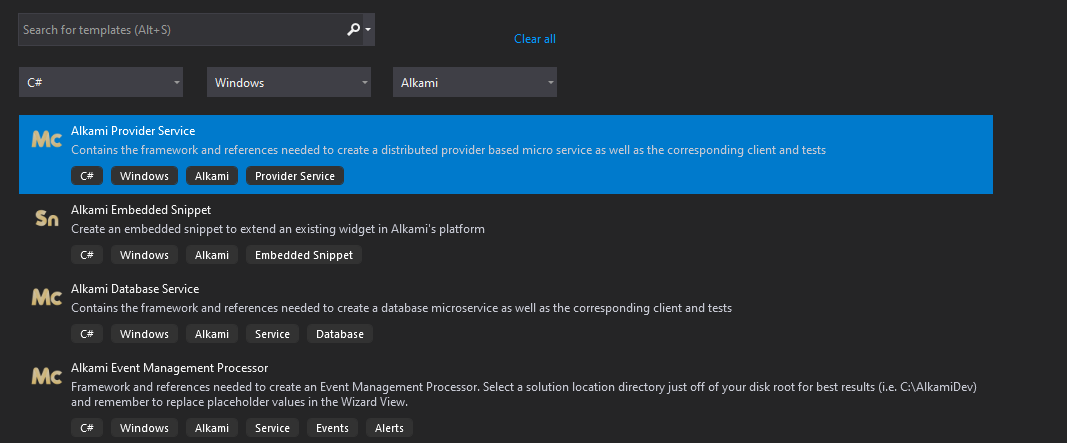
-
Select the
Alkami Provider Servicetemplate and clickNext. -
Name the project according to the Microservice Coding Guidelines page. In this example, use
USBFI.MS.FirstService. -
Select a path close to your C:\ drive.
-
Uncheck ‘Place solution and project in same directory’ option if it is selected.
-
Do not select any options and click
Create.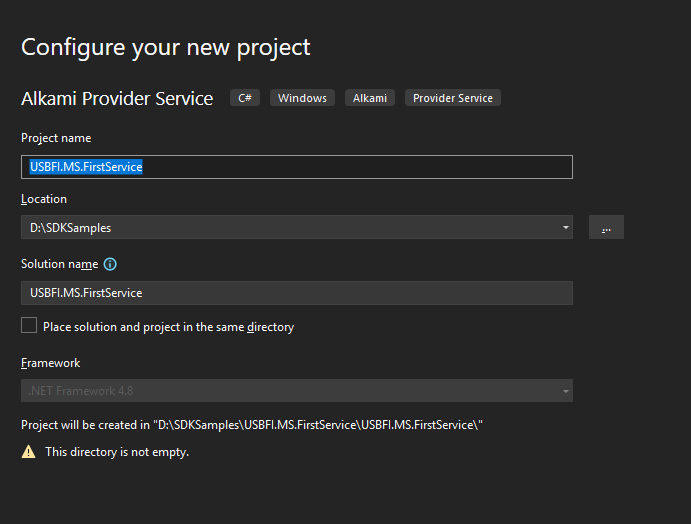
Build the Solution
Section titled “Build the Solution”- By default the
Service.Hostwill be the Startup Project.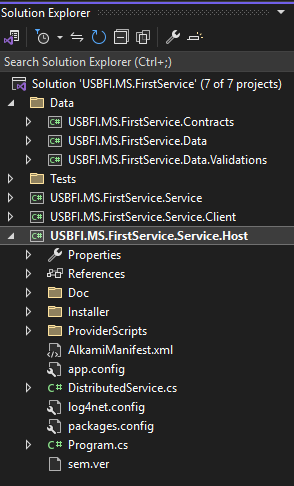 a.If it is not, right-click the project and select
 Set as StartUp Project. Build the solution to restore the NuGet packages and create a Debug build of the service.
Configure the Service
Section titled “Configure the Service”-
To insert the service configuration into the
DeveloperDynamicdatabase, locate theinsert_provider_setting.sqlin theService.Hostproject and open it using your SQL engine of choice.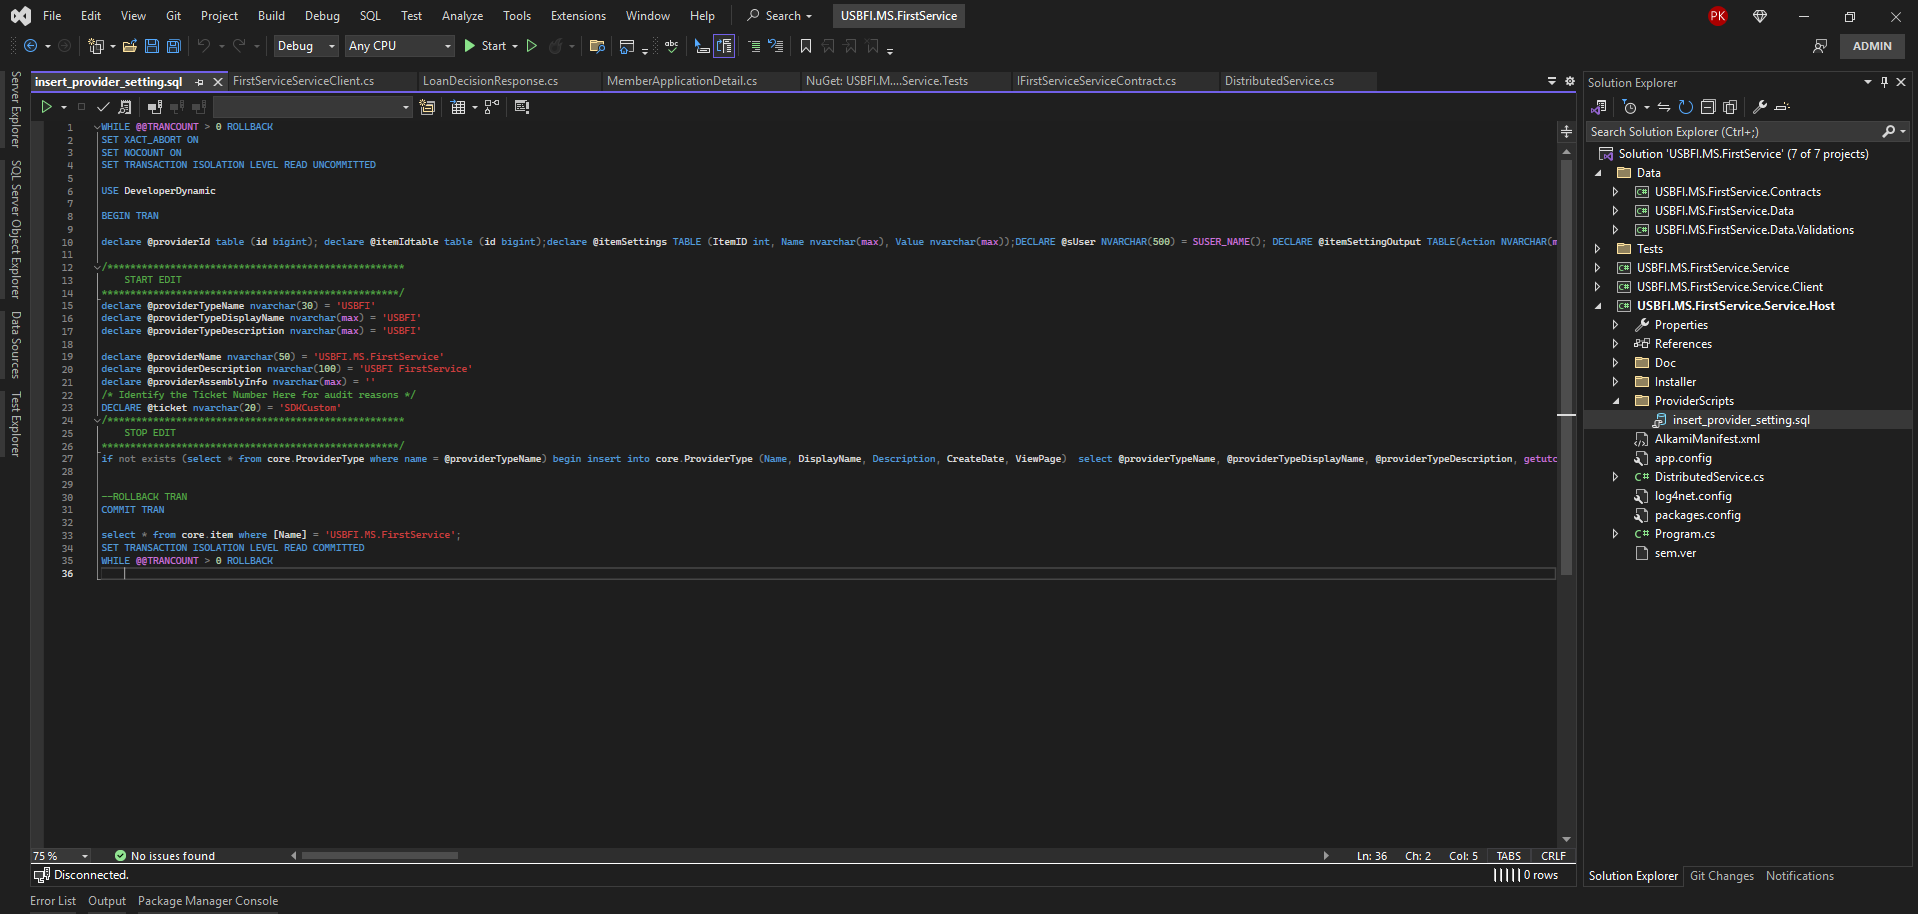
-
Run the script.
-
In
Server Name, type . then clickConnect.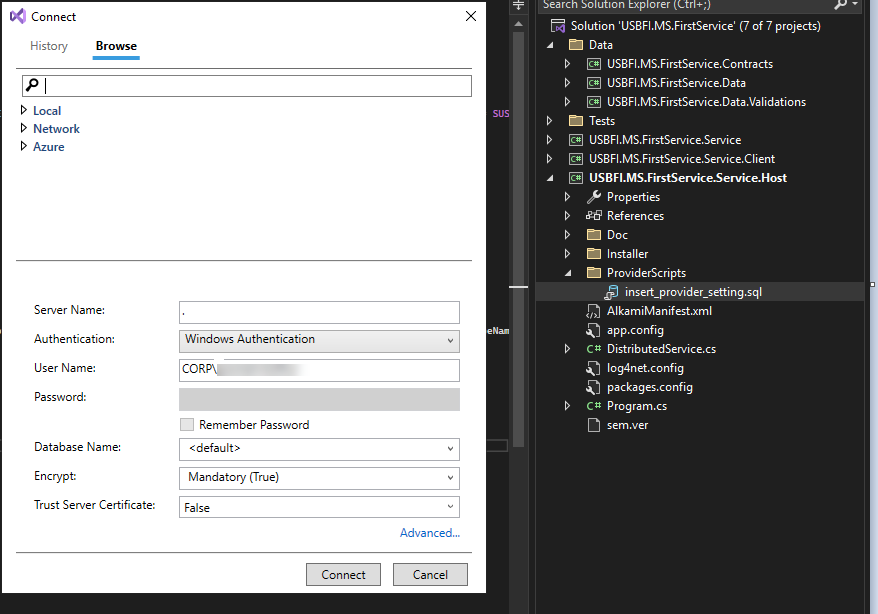
Run and Test the Service
Section titled “Run and Test the Service”-
Open the
Serviceproject.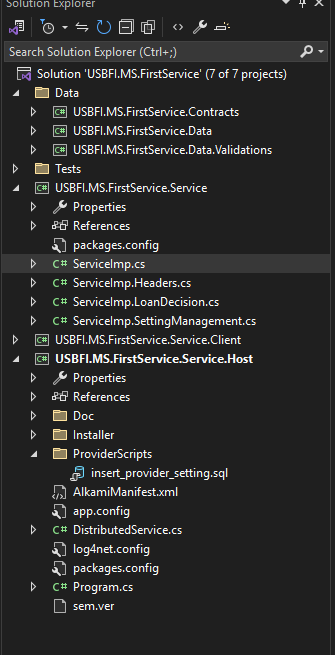
-
Click to set a break point on the first line of of the
ServiceImp.GetSettingsAsync()method within theServiceImp.csclass.
-
Run(F5) the solution within Visual Studio (Administrator). This opens acmd.exewindow that encapsulates theHostproject to make debugging easier. See Topshelf’s documentation page for more information about this strategy.A console window opens and runs the service so you can see what is happening in the subscription service. The
GetSettingsAsync()public method has asolid redbreak point.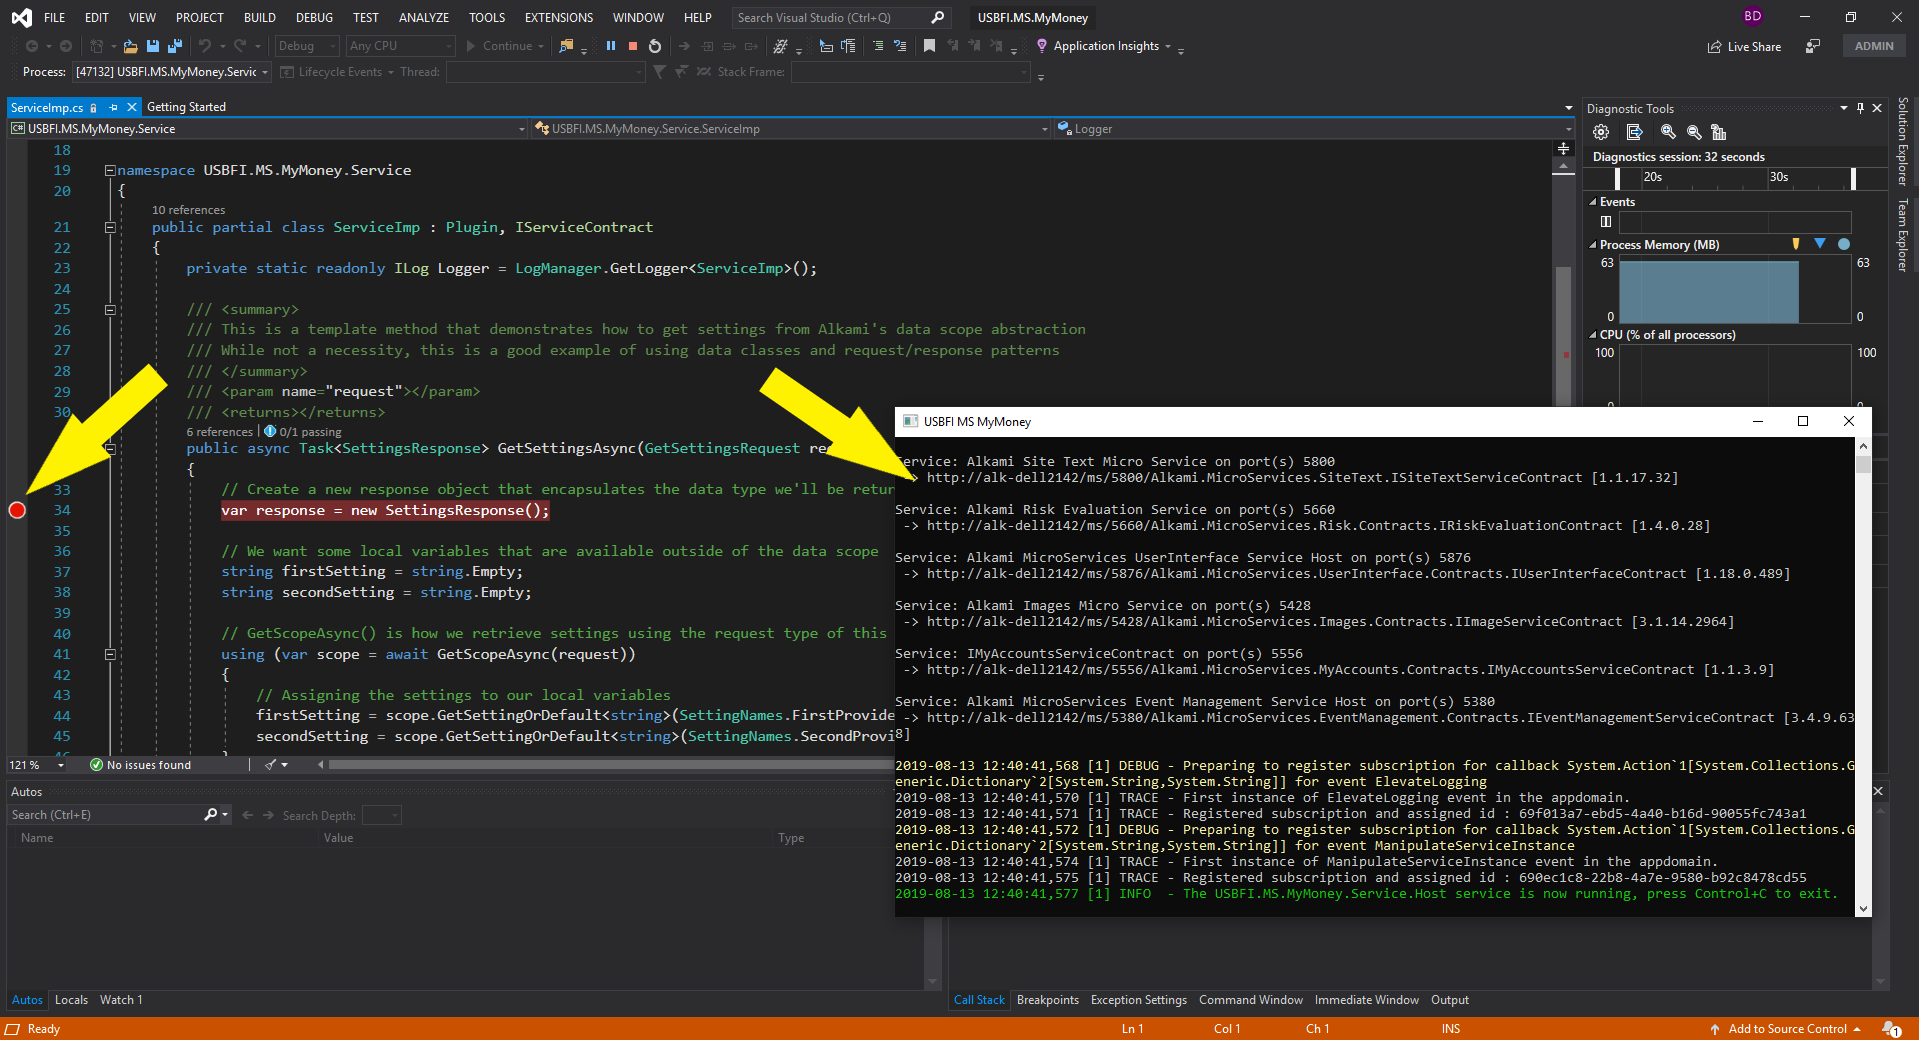
-
Open the Windows Services to see a list of Alkami services including the
Alkami.Services.SubscriptionHost.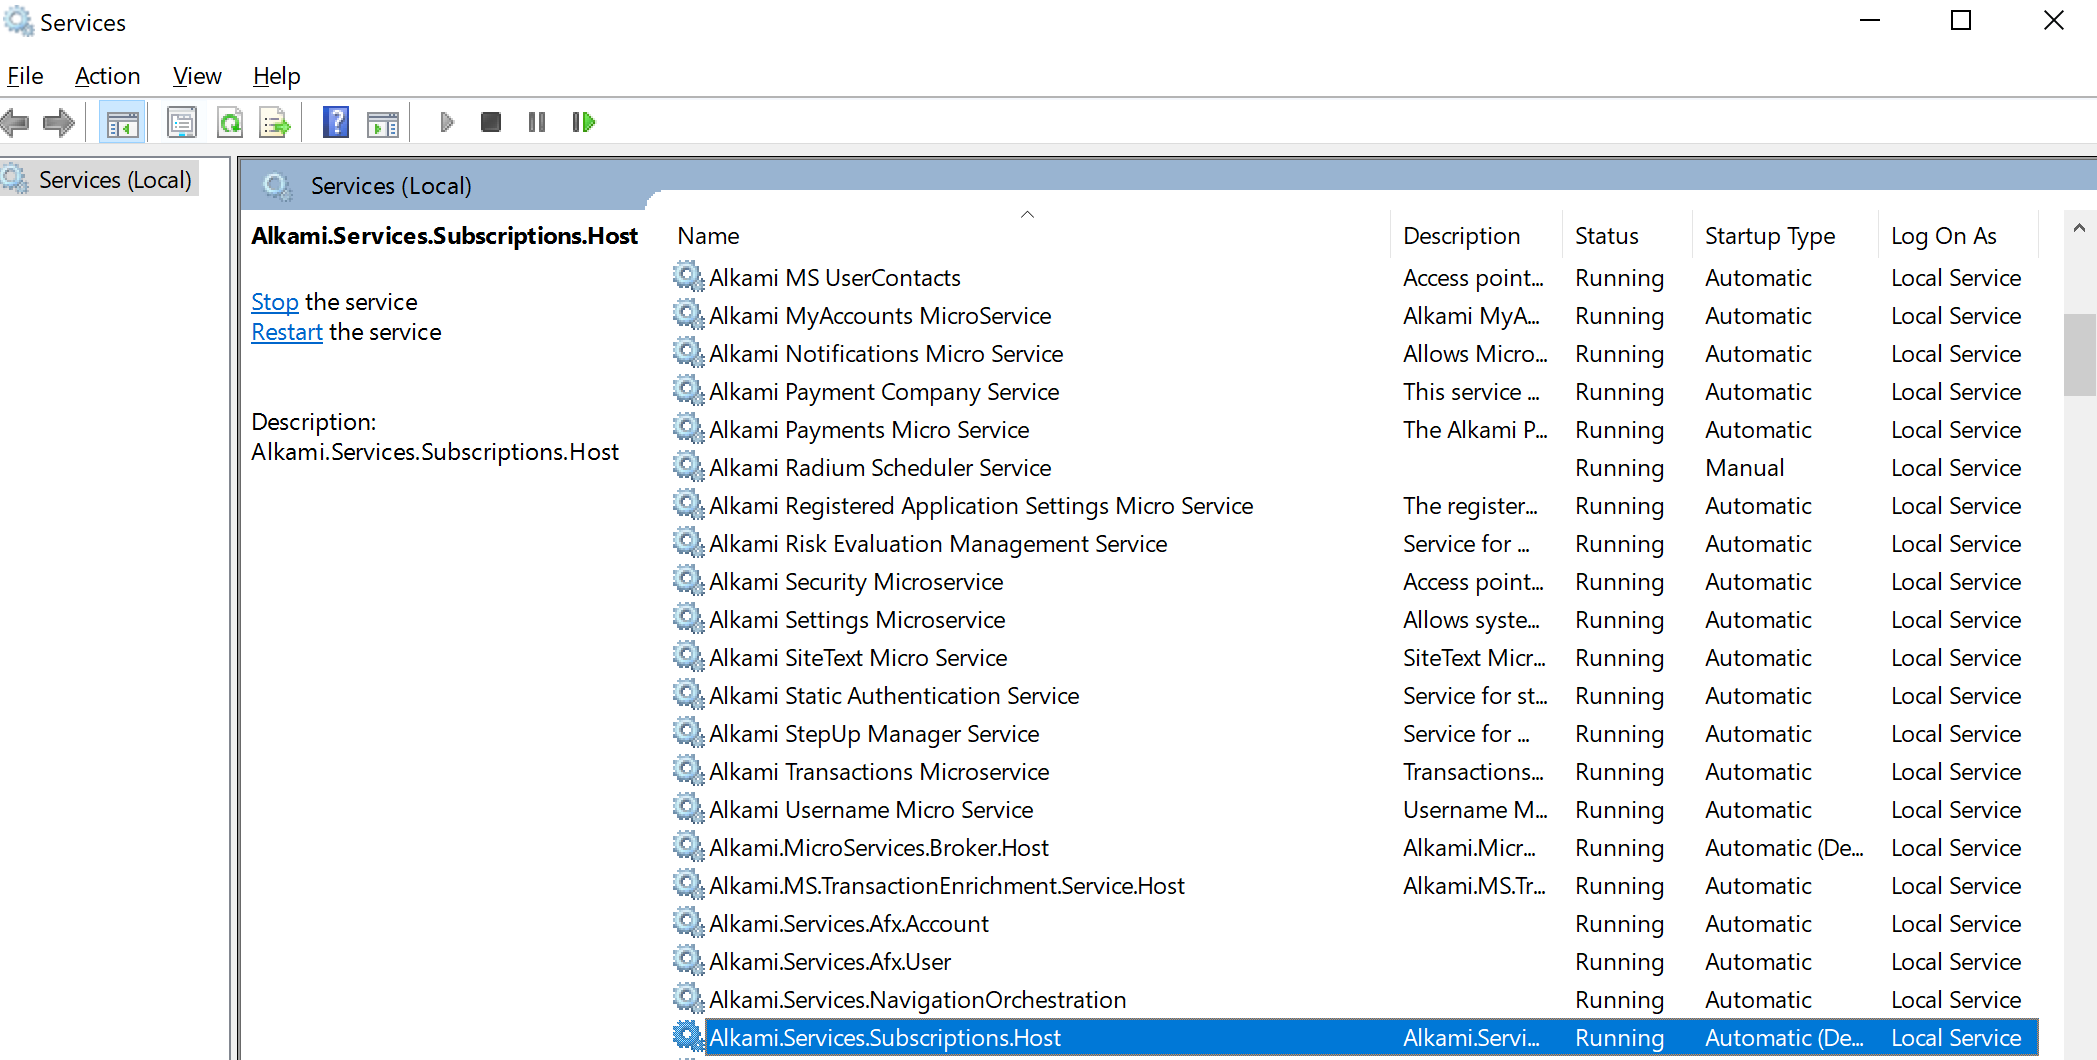
Alkami Micro Service Tester
Section titled “Alkami Micro Service Tester”To exercise and test the service, use Alkami’s Micro Service Tester.
-
Run the following command:
choco install Alkami.MicroServiceTester -y
-
After installation, from the
Windows Start Menu, search for and openMicroServiceTester. The left margin lists the available services. -
Double-click a service to view the available contract methods.
-
Select a contract method.
-
For our new service, we will select
GetSettingsand then clickSend Message. The tester sends a request and the code execution should pause on the break point we set in theGetSettingsAsync()implementation method.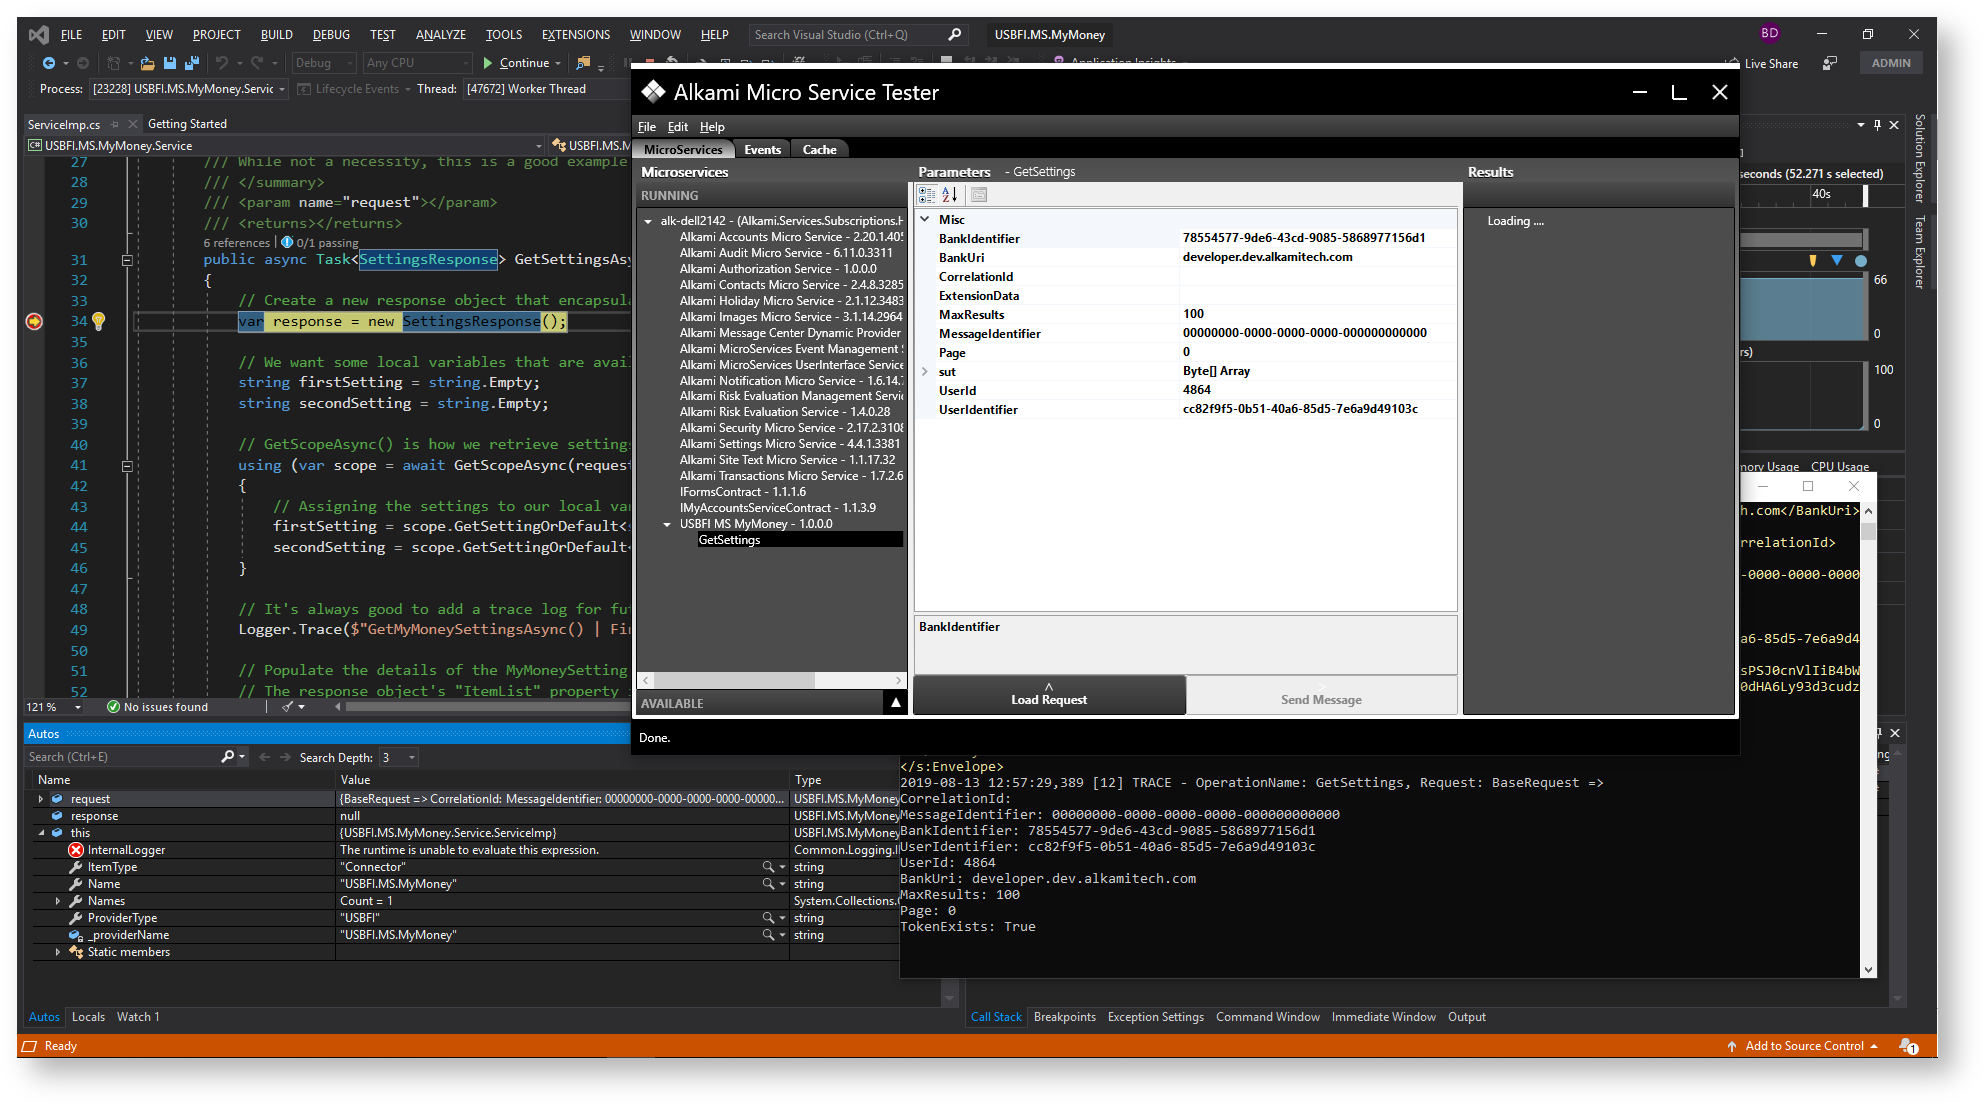
Unit Tests
Section titled “Unit Tests”The template creates a test project and a single test method CanGetSettings() that will create an instance of the distributed service. It then uses the DistributedServices.cs
class in the ServiceHost project to call the GetSettingsAsync() method and assert that the two default settings are fetched properly.
- Place a break point in the
CanGetSettings()test method to debug the service using a unit test. - Press
F10to step through the code execution.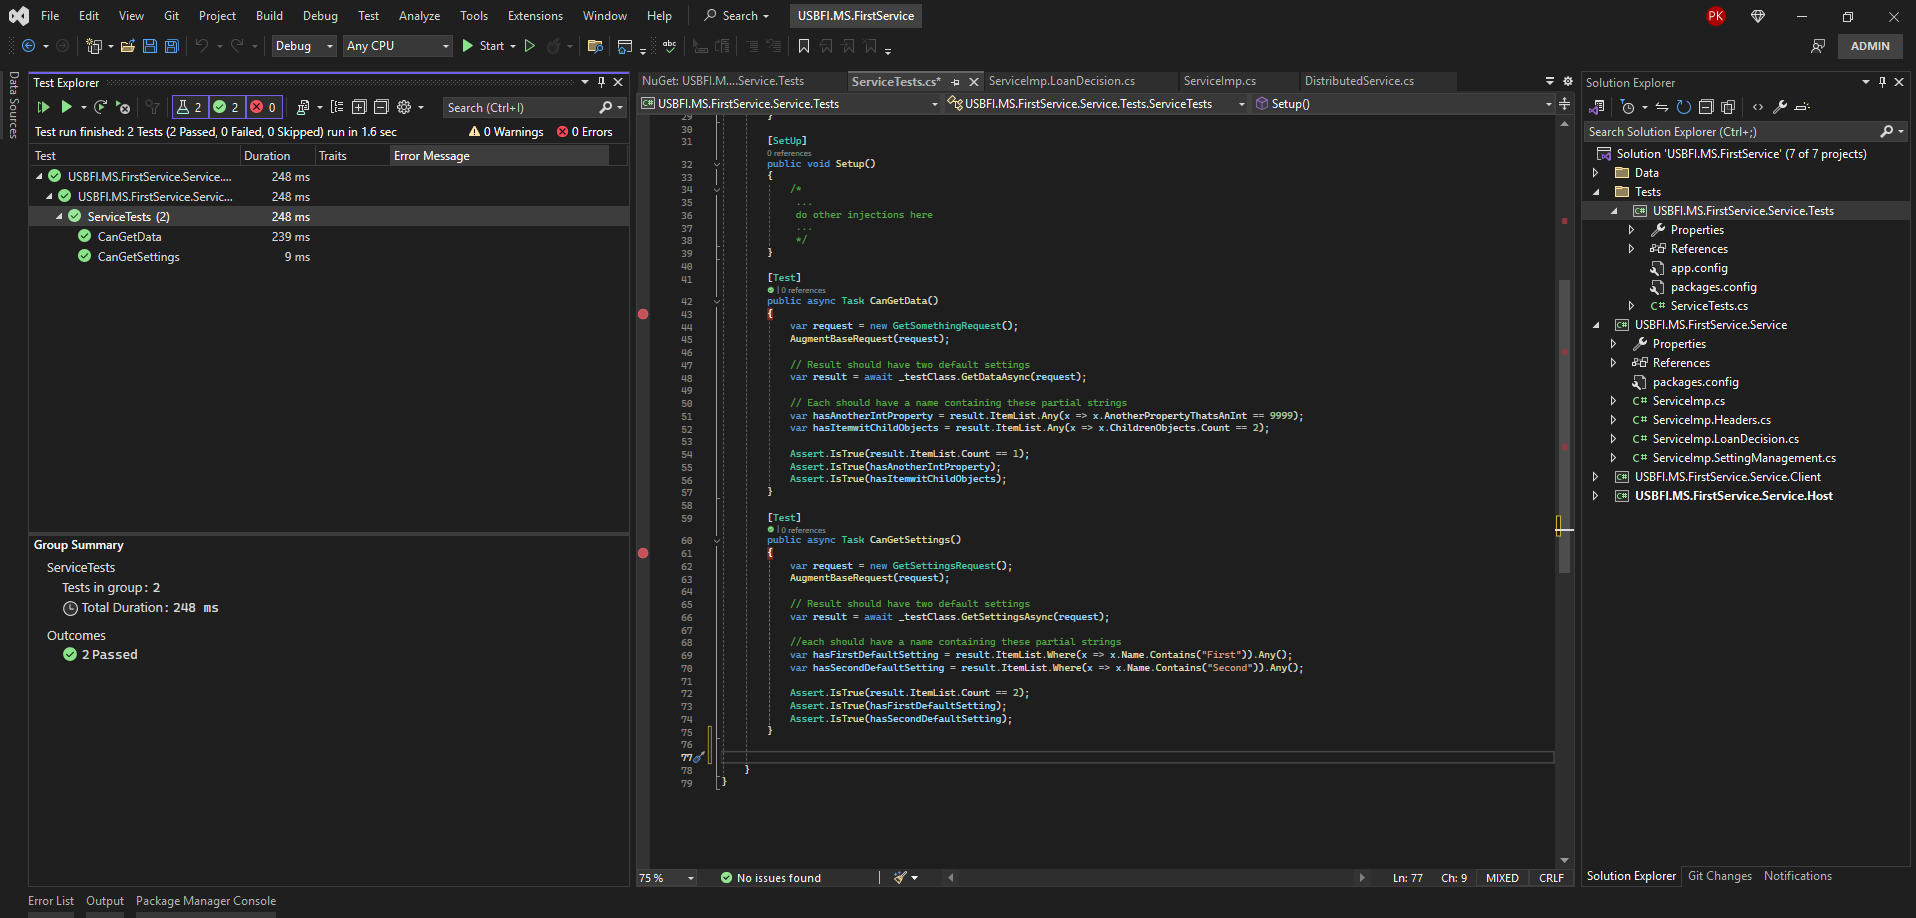
First Service Loan Decision Feature
Section titled “First Service Loan Decision Feature”The remainder of this tutorial will use an invented feature to guide the developer through the process of extending the template service.
The example feature is a Loan Decision engine and will generate a loan approval and a loan amount based on some information provided by the member.
The client request will contain a data model that describes the Application Detail submitted by a member.
The response will contain a similar model that describes the Loan Detail returned by our decision logic.
We will define new settings, create a request and a response object, create data validations where necessary and add a new GetLoanDecisionAsync() method so that other services
and widgets can use the new First Service feature.
Define the new settings
Section titled “Define the new settings”All settings are defined within the service itself. The admin portal has the privilege of overriding the default settings by persisting the values to Alkami’s database. These database values will be used as overrides of the DefaultSettings we’ll be creating in this tutorial.
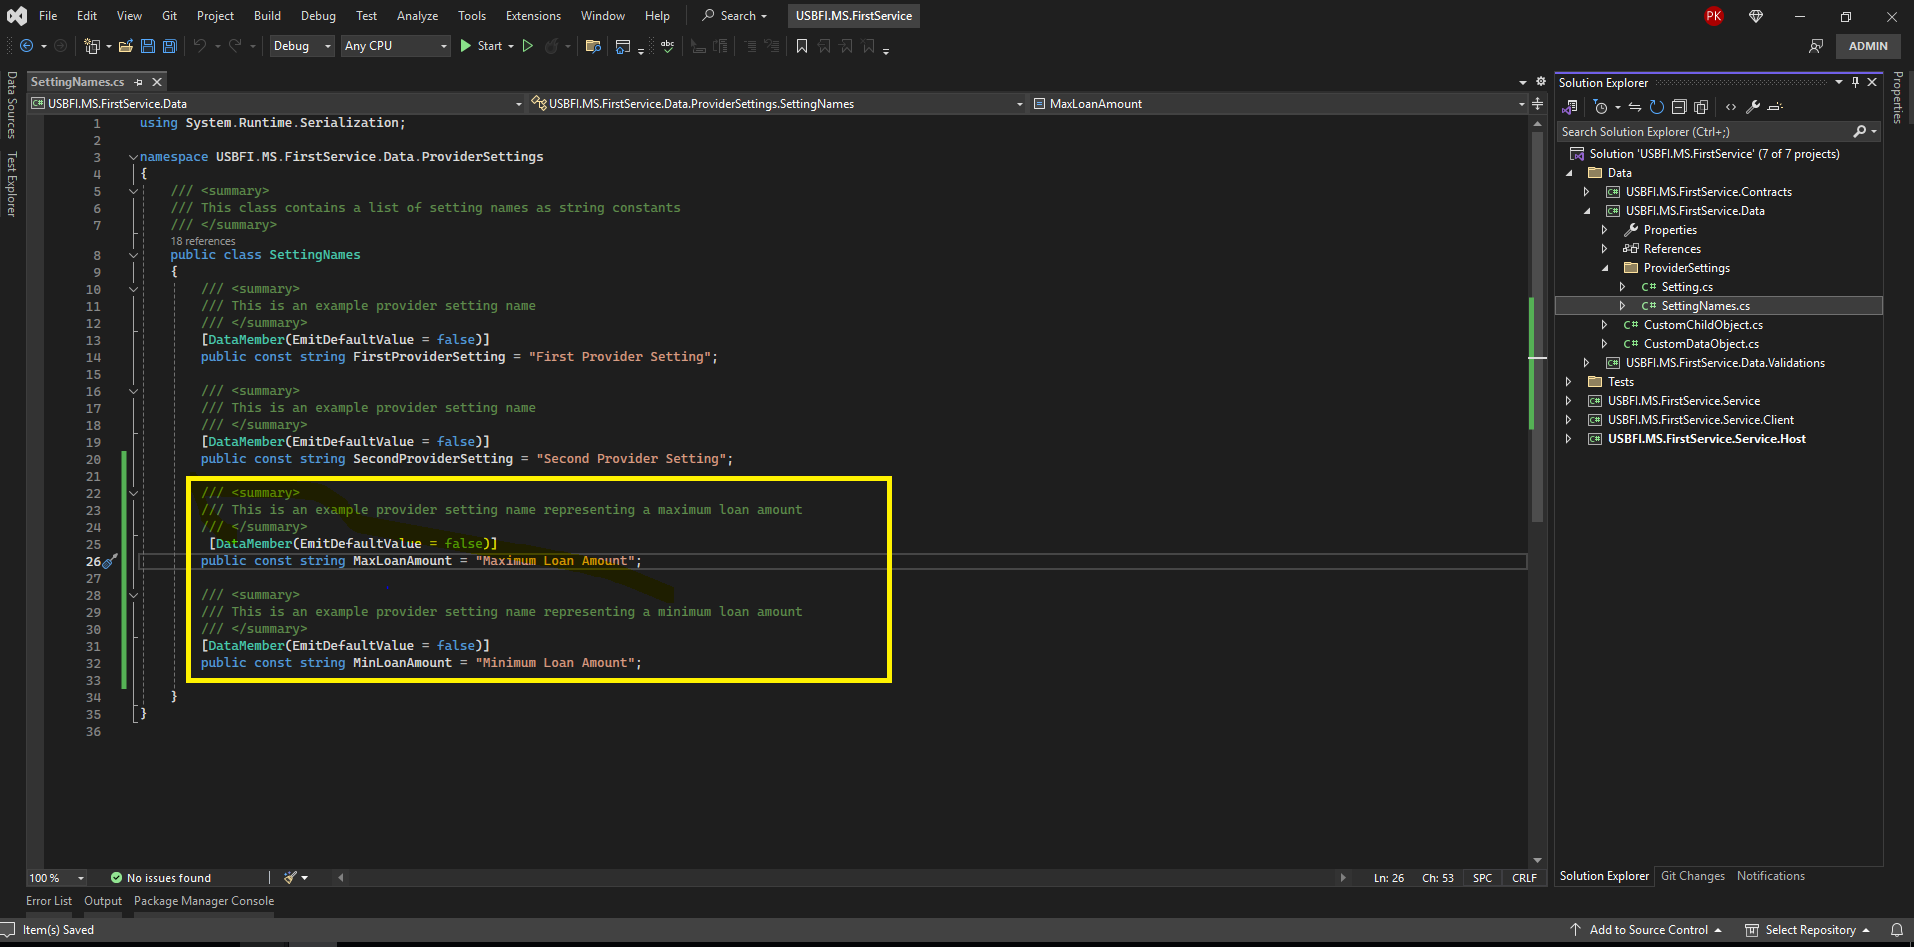
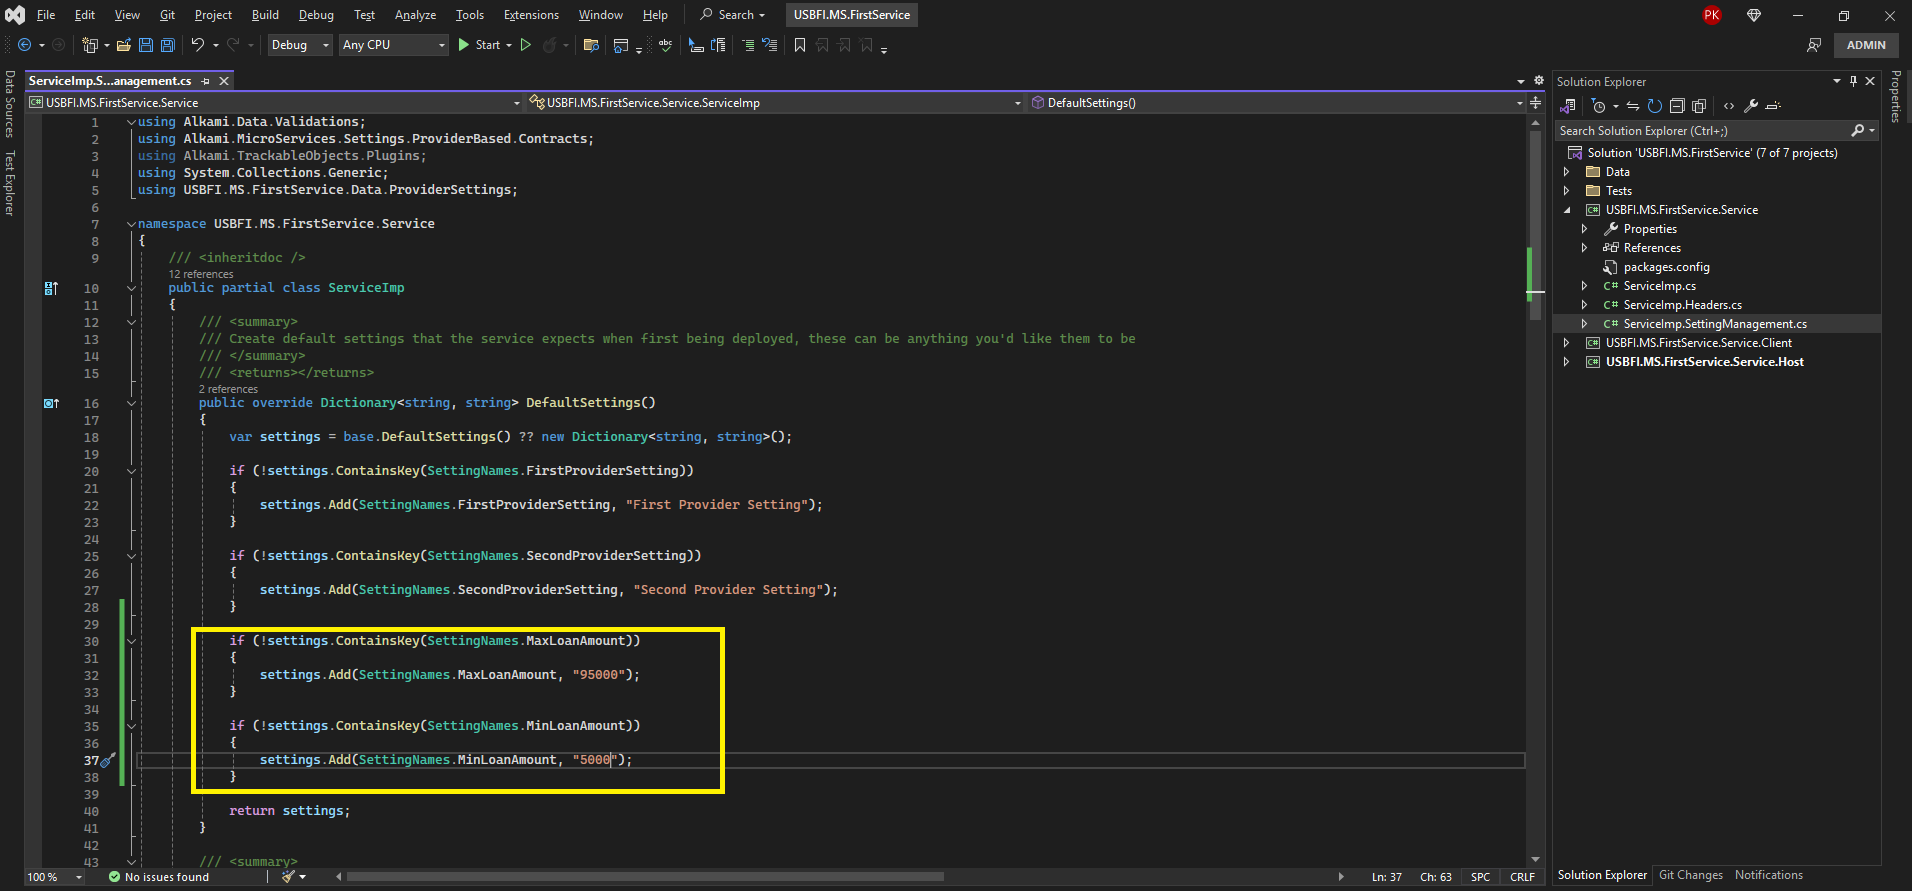
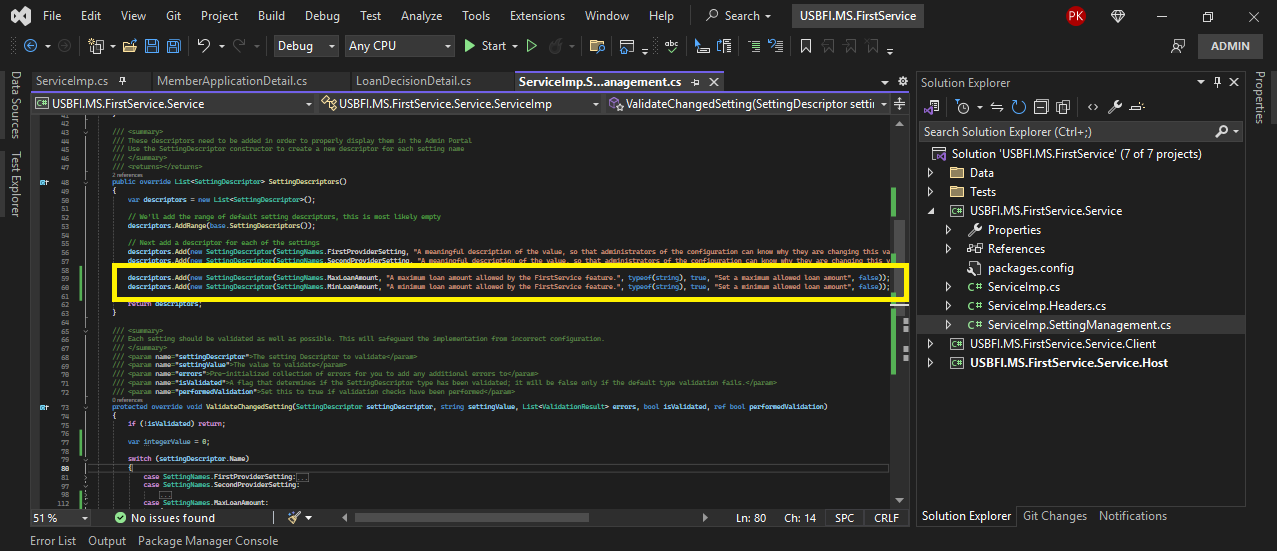
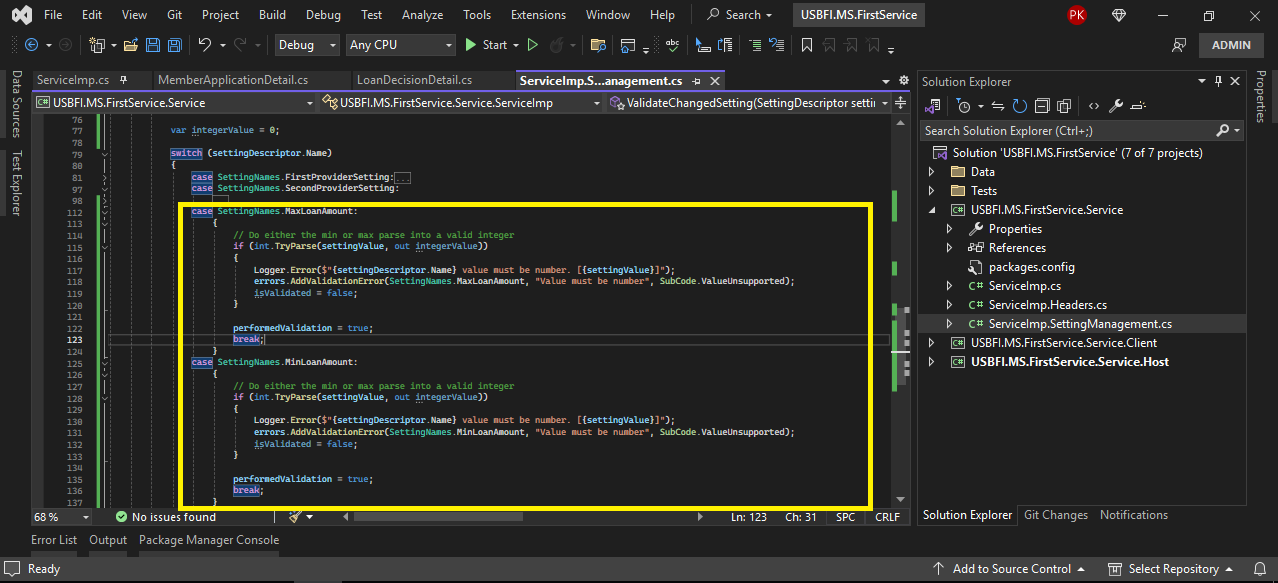
We’ll duplicate a lot of the existing pattern in order to add two new template settings. The areas that should be added to your classes are highlighted in yellow.
Add the new setting name(s)
Section titled “Add the new setting name(s)”One of the features in the FirstService service will determine if a member is eligible for a loan. The loan amount should not exceed a maximum amount and must be greater than a
minimum amount. These two values are great candidates to be converted to configurable settings.
Add the default setting values
Section titled “Add the default setting values”In this case, we’ll set the default values for the max and min to 95000 and 5000 respectively.
Add new descriptors
Section titled “Add new descriptors”Descriptors are required and further define the settings when viewing them in the Admin Portal. It’s important to make these meaningful and as descriptive as possible.
Create new setting validations
Section titled “Create new setting validations”The last step is to add validations for these two new settings. These validations are executed when an admin user attempts to update these values using Alkami’s Admin Portal UI.
For this example, we’ll make sure to fail any values that cannot be parsed into an integer.
Read the new setting
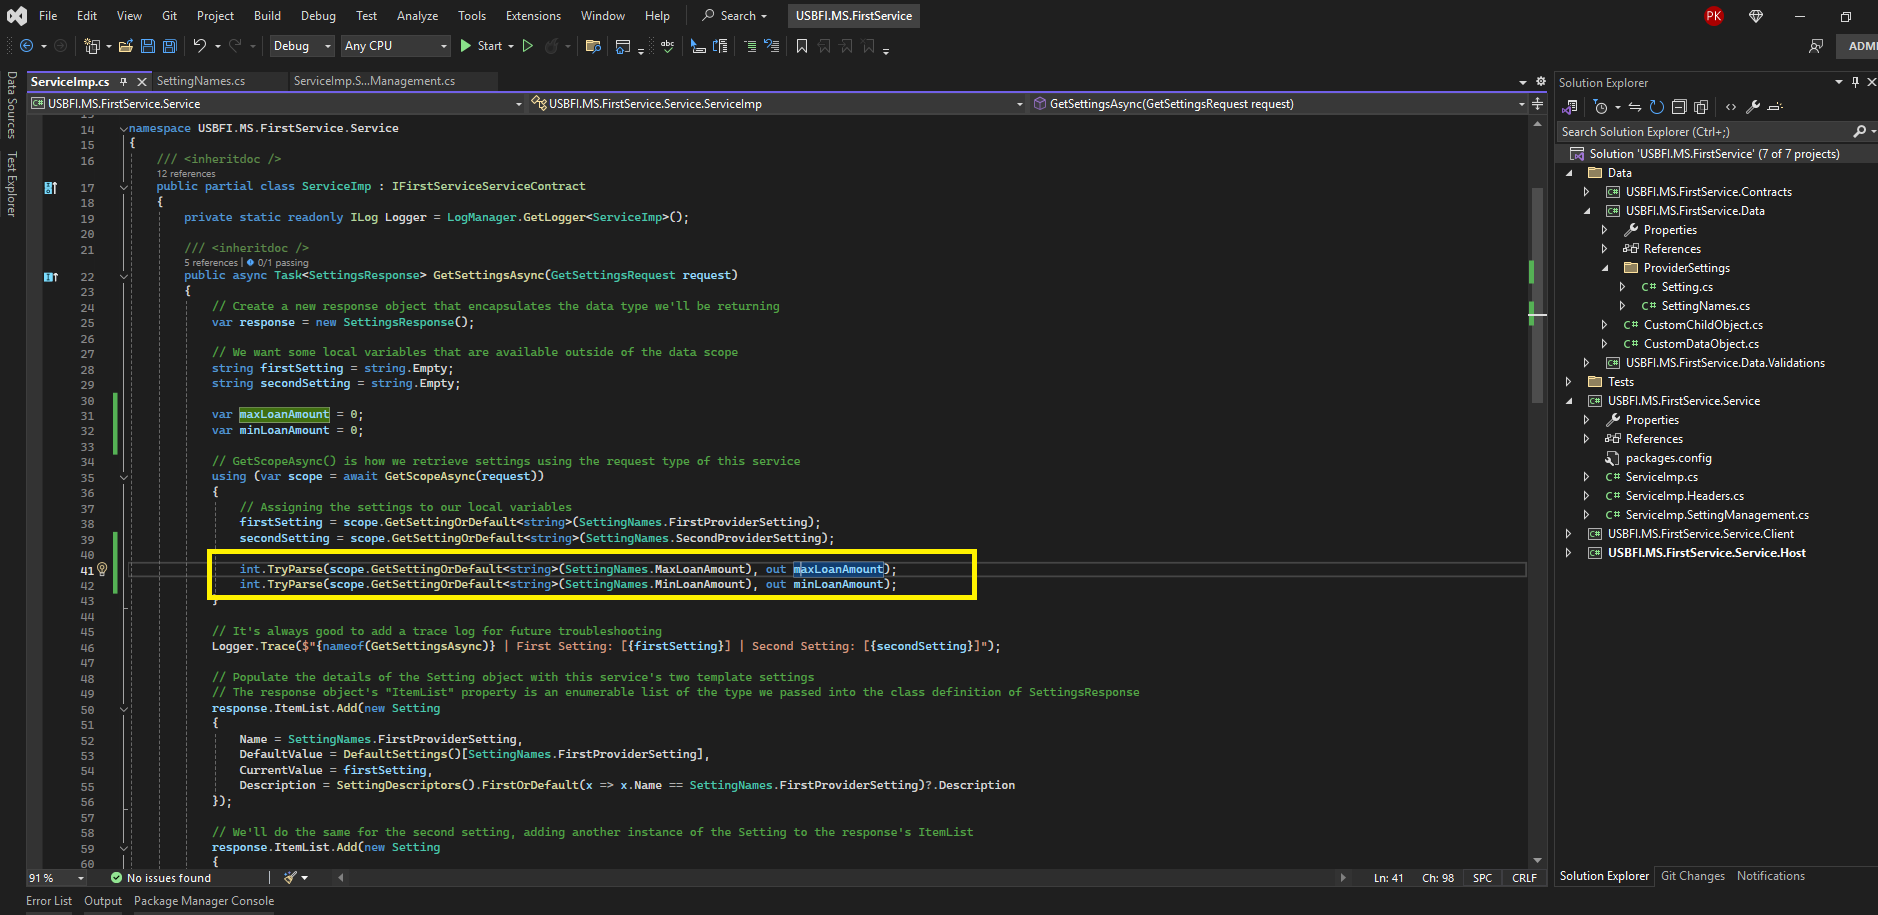
Section titled “Read the new setting”The existing template settings already show the proper pattern for reading settings, we’ll do the same but instead of assigning the string value we’ll parse it into a usable integer type.
We’ll create two local variables so that we can use the settings outside of the disposable DataScope() and then parse the settings into the proper primitive type and assign them
to the local variables.
Adding New Contract Methods
Section titled “Adding New Contract Methods”In the previous section we added new settings and updated the existing GetSettingsAsync() method to read in the new values. This section will focus on adding a new public contract method to the service that contains some business logic that will use the new settings we added before.
Much of this implementation is new code, we’ve provided the classes in full so that users can easily copy and paste where necessary. Also, the source code has been provided at the top of this page.
Defining New Request and Response Types
Section titled “Defining New Request and Response Types”Requests and responses should be more than a list of properties. The service architecture gives the developer full freedom to define complex object types and for that reason we’ll be creating new data objects that will be members of the request and response objects.
Create new data objects
Section titled “Create new data objects”The request and response types will have data object members to customize the type of information we want to receive and return. We’ll be taking a member’s application details as part of the request and responding with the loan details once we’ve ran through our logic.
Add two new classes to the Data project, named LoanDecisionDetail.cs that will be used to store the data from our decisioning logic and MemberApplicationDetail.cs
that will contain the information we will use within the decision process.
LoanDecisionDetail.cs
using System;using System.Runtime.Serialization;
namespace USBFI.MS.FirstService.Data{    /// <summary>    /// The loan decision detail contains the results of a decision and returned as part of the LoanDecisionResponse    /// </summary>    [DataContract(IsReference = false)]    public class LoanDecisionDetail    {        /// <summary>        /// The decisions unique identifier for reference        /// </summary>        [DataMember(EmitDefaultValue = false)]        public Guid DecisionId { get; set; }
        /// <summary>        /// The approval decision on this particular loan detail        /// </summary>        [DataMember(EmitDefaultValue = false)]        public bool Approved { get; set; }
        /// <summary>        /// The originating application details that this decision was based on        /// </summary>        [DataMember(EmitDefaultValue = false)]        public MemberApplicationDetail ApplicationDetail { get; set; }
        /// <summary>        /// The custom internal score for this member        /// </summary>        [DataMember(EmitDefaultValue = false)]        public int CustomCompositeScore { get; set; }
        /// <summary>        /// The loan amount approved for this decision        /// </summary>        [DataMember(EmitDefaultValue = false)]        public int LoanAmount { get; set; }    }}
MemberApplicationDetail.cs
using System.Runtime.Serialization;
namespace USBFI.MS.FirstService.Data{    [DataContract(IsReference = false)]    public class MemberApplicationDetail    {        /// <summary>        /// An arbitrary application number        /// </summary>        [DataMember(EmitDefaultValue = false)]        public string ApplicationNumber { get; set; }
        /// <summary>        /// The unique identifier of this member        /// </summary>        [DataMember(EmitDefaultValue = false)]        public string MemberIdentifier { get; set; }
        /// <summary>        /// The members transunion credit score        /// </summary>        [DataMember(EmitDefaultValue = false)]        public int TransUnionScore { get; set; }
        /// <summary>        /// The members equifax credit score        /// </summary>        [DataMember(EmitDefaultValue = false)]        public int EquifaxScore { get; set; }
        /// <summary>        /// The members annual income        /// </summary>        [DataMember(EmitDefaultValue = false)]        public int AnnualIncome { get; set; }    }}
Create the new request and responses classes
Section titled “Create the new request and responses classes”In the Contracts project, add these classes below to the Requests and Responses folders respectively
GetLoanDecisionRequest.cs
using Alkami.Contracts;using System.Runtime.Serialization;using USBFI.MS.FirstService.Data;
namespace USBFI.MS.FirstService.Contracts.Requests{    /// <summary>    /// The request object used when calling the GetLoanDecisionAsync() implementation method    /// </summary>    [DataContract(IsReference = true)]    public class GetLoanDecisionRequest : BaseRequest    {        /// <summary>        /// All the information need to make a loan decision for this member        /// </summary>        [DataMember(EmitDefaultValue = true)]        public MemberApplicationDetail ApplicationDetail { get; set; }    }}
LoanDecisionResponse.cs
using Alkami.Contracts;using System.Runtime.Serialization;using USBFI.MS.FirstService.Data;
namespace USBFI.MS.FirstService.Contracts.Responses{/// <summary> /// A response object that contains an ItemList of LoanDecisionDetail /// </summary>    [DataContract(IsReference = true)]    public class LoanDecisionResponse : BaseResponse<LoanDecisionDetail>    {    }}
Creating an Entity Validator
Section titled “Creating an Entity Validator”The new request and its members should have validations to make sure the service performs as efficiently as possible.
We will create two new entity validators, one for the GetLoanDecisionRequest.cs and another for the MemberApplicationDetail.cs
which is an object member of the GetLoanDecisionRequest.cs. We want to make sure both of these types are formatted correctly
before we send the request to the implementation method.
Add the following classes to the Validations project
using Alkami.Data.Validations;using System.Collections.Generic;
namespace USBFI.MS.FirstService.Data.Validations{/// <summary> /// This validator interrogates a MemberLoanDetail object for the proper information /// </summary>    public class MemberApplicationDetailValidator : EntityValidatorImpl<MemberApplicationDetail>    {        /// <summary>        /// Make sure the application details are properly filled out        /// </summary>        /// <param name="src"></param>        /// <returns></returns>        protected override List<ValidationResult> ValidateInternal(MemberApplicationDetail src)        {            var results = new List<ValidationResult>();
            if (src == null)            {                results.Add(new ValidationResult()                {                    ErrorCode = ErrorCode.ValidationError,                    Field = "MemberApplicationDetail",                    Message = "The MemberApplicationDetail cannot be null.",                    Severity = Severity.Error,                    SubCode = SubCode.None                });
                return results;            }
            if (src.AnnualIncome <= 0)            {                results.Add(new ValidationResult()                {                    ErrorCode = ErrorCode.ValidationError,                    Field = "AnnualIncome",                    Message = "The AnnualIncome cannot be less than or equal to 0.",                    Severity = Severity.Error,                    SubCode = SubCode.None                });            }
            if (src.MemberIdentifier == null)            {                results.Add(new ValidationResult()                {                    ErrorCode = ErrorCode.ValidationError,                    Field = "MemberIdentifier",                    Message = "The MemberIdentifier cannot be null",                    Severity = Severity.Error,                    SubCode = SubCode.None                });            }
            if (src.EquifaxScore <= 0)            {                results.Add(new ValidationResult()                {                    ErrorCode = ErrorCode.ValidationError,                    Field = "EquifaxScore",                    Message = "The EquifaxScore is missing. This may cause a rejection when reviewing the application.",                    Severity = Severity.Warning,                    SubCode = SubCode.None                });            }
            if (src.TransUnionScore <= 0)            {                results.Add(new ValidationResult()                {                    ErrorCode = ErrorCode.ValidationError,                    Field = "TransUnionScore",                    Message = "The TransUnionScore is missing. This may cause a rejection when reviewing the application.",                    Severity = Severity.Warning,                    SubCode = SubCode.None                });            }
            return results;        }    }}
GetLoanDecisionRequestValidator.cs
using Alkami.Data.Validations;using System.Collections.Generic;using USBFI.MS.FirstService.Contracts.Requests;
namespace USBFI.MS.FirstService.Data.Validations{    /// <summary>    /// Request Validators are useful to keep malformed requests from crossing the wire.    /// We'll only send requests that pass these validations.    /// </summary>    public class GetLoanDecisionRequestValidator : EntityValidatorImpl<GetLoanDecisionRequest>    {        /// <summary>        /// Validate that all the loan details on this request are properly filled out        /// </summary>        /// <param name="src"></param>        /// <returns></returns>        protected override List<ValidationResult> ValidateInternal(GetLoanDecisionRequest src)        {            List<ValidationResult> results = new List<ValidationResult>();
            // Make sure the response has application details to validate            if (src.ApplicationDetail == null)            {                // The application detail is null, we cannot do anything more                results.Add(new ValidationResult()                {                    ErrorCode = ErrorCode.ValidationError,                    Field = "GetLoanDecisionRequest",                    Message = "Member Application Details cannot be null.",                    Severity = Severity.Error,                    SubCode = SubCode.MalformedRequest                });                return results;            }
            // We created a validator for the application details in the MemberApplicationDetailValidator class, we can call that validator directly            var isLoanDetailValid = src.ApplicationDetail.Validate(out results);            if (!isLoanDetailValid)            {                // The application detail is not passing our validation and therefor we will not send the request                results.Add(new ValidationResult()                {                    ErrorCode = ErrorCode.ValidationError,                    Field = "GetLoanDecisionRequest",                    Message = "The request contained incomplete Member Application Details. Please see other validation errors for detailed information.",                    Severity = Severity.Error,                    SubCode = SubCode.MalformedRequest                });            }
            return results;        }    }}
Updating the Service Contract
Section titled “Updating the Service Contract”The IFirstServiceContract is the interface that defines which implementation methods are available to be publicly called.
We want our new method to be publicly accessible so we’ll need to add that method stub.
This is the full IFirstServiceContract.cs with the new GetLoanDecisionAsync() method stubbed out.
IFirstServiceContract.cs
using System.ServiceModel;using System.Threading.Tasks;using USBFI.MS.FirstService.Contracts.Requests;using USBFI.MS.FirstService.Contracts.Responses;
namespace USBFI.MS.FirstService.Contracts{    /// <summary>    /// The IService Contract for USBFI.MS.FirstService.Contracts    /// </summary>    [ServiceContract]    public interface IFirstServiceServiceContract    {        /// <summary>        /// This is a template method that demonstrates how to get settings from Alkami's data scope abstraction        /// It is sometimes useful to have a service's settings within a widget or another service.        /// This service may be one part of a feature, but it's possible to store all feature settings within a single service        /// Any other widgets or services that are a part of this feature can easily get all the settings they need by calling this method        /// </summary>        /// <param name="request"></param>        /// <returns></returns>        [OperationContract]        Task<SettingsResponse> GetSettingsAsync(GetSettingsRequest request);
        /// <summary>        /// Get something from a third party service or API        /// </summary>        /// <param name="request"></param>        /// <returns></returns>        [OperationContract]        Task<CustomObjectResponse> GetDataAsync(GetSomethingRequest request);
        /// <summary>        /// Part of the FirstService feature set that determines if a loan can be approved        /// The request will contain member application details and a decision tree will be executed to determine if a loan amount has been approved        /// </summary>        /// <param name="request"></param>        /// <returns></returns>        [OperationContract]        Task<LoanDecisionResponse> GetLoanDecisionAsync(GetLoanDecisionRequest request);
    }}
Updating the Service Client
Section titled “Updating the Service Client”The service client is the proxy between the caller and the host service. We’ll need to stub out a proxy method similar to the one that was added by the template.
Add the new GetLoanDecisionAsync() method stub so that your class looks like the one below
FirstServiceServiceClient.cs
using Alkami.MicroServices.Settings.ProviderBasedClient;using System.Threading.Tasks;using USBFI.MS.FirstService.Contracts;using USBFI.MS.FirstService.Contracts.Requests;using USBFI.MS.FirstService.Contracts.Responses;
namespace USBFI.MS.FirstService.Service.Client{    /// <inheritdoc />    public class FirstServiceServiceClient : ProviderBasedClient<IFirstServiceServiceContract>, IFirstServiceServiceContract    {        /// <summary>        /// The unique provider type designator for this service        /// </summary>        private const string ProviderType = "USBFI";
        /// <summary>        ///  ProviderBased constructor        /// </summary>        public FirstServiceServiceClient() : base(ProviderType)        { }
        /// <summary>        /// ProviderBased constructor override        /// </summary>        /// <param name="providerId"></param>        public FirstServiceServiceClient(long providerId) : base(ProviderType, providerId)        { }
        /// <inheritdoc />        public Task<SettingsResponse> GetSettingsAsync(GetSettingsRequest request)        {            return ProxyCall((operation, inner) => operation.GetSettingsAsync(inner), request);        }
        /// <inheritdoc />        public Task<CustomObjectResponse> GetDataAsync(GetSomethingRequest request)        {            return ProxyCall((operation, inner) => operation.GetDataAsync(inner), request);        }
        /// <inheritdoc />        public Task<LoanDecisionResponse> GetLoanDecisionAsync(GetLoanDecisionRequest request)        {            return ProxyCall((operation, inner) => operation.GetLoanDecisionAsync(inner), request);        }    }}
Updating ServiceImp
Section titled “Updating ServiceImp”ServiceImp.cs
using Alkami.Data.Validations;using Common.Logging;using System;using System.Collections.Generic;using System.Linq;using System.Threading.Tasks;using USBFI.MS.FirstService.Contracts;using USBFI.MS.FirstService.Contracts.Requests;using USBFI.MS.FirstService.Contracts.Responses;using USBFI.MS.FirstService.Data;using USBFI.MS.FirstService.Data.ProviderSettings;
namespace USBFI.MS.FirstService.Service{    /// <inheritdoc />    public partial class ServiceImp : IFirstServiceServiceContract    {        private static readonly ILog Logger = LogManager.GetLogger<ServiceImp>();
        /// <inheritdoc />        public async Task<SettingsResponse> GetSettingsAsync(GetSettingsRequest request)        {            // Create a new response object that encapsulates the data type we'll be returning            var response = new SettingsResponse();
            // We want some local variables that are available outside of the data scope            string firstSetting = string.Empty;            string secondSetting = string.Empty;
            var maxLoanAmount = 0;            var minLoanAmount = 0;
            // GetScopeAsync() is how we retrieve settings using the request type of this service            using (var scope = await GetScopeAsync(request))            {                // Assigning the settings to our local variables                firstSetting = scope.GetSettingOrDefault<string>(SettingNames.FirstProviderSetting);                secondSetting = scope.GetSettingOrDefault<string>(SettingNames.SecondProviderSetting);
                int.TryParse(scope.GetSettingOrDefault<string>(SettingNames.MaxLoanAmount), out maxLoanAmount);                int.TryParse(scope.GetSettingOrDefault<string>(SettingNames.MinLoanAmount), out minLoanAmount);            }
            // It's always good to add a trace log for future troubleshooting            Logger.Trace($"{nameof(GetSettingsAsync)} | First Setting: [{firstSetting}] | Second Setting: [{secondSetting}]");
            // Populate the details of the Setting object with this service's two template settings            // The response object's "ItemList" property is an enumerable list of the type we passed into the class definition of SettingsResponse            response.ItemList.Add(new Setting            {                Name = SettingNames.FirstProviderSetting,                DefaultValue = DefaultSettings()[SettingNames.FirstProviderSetting],                CurrentValue = firstSetting,                Description = SettingDescriptors().FirstOrDefault(x => x.Name == SettingNames.FirstProviderSetting)?.Description            });
            // We'll do the same for the second setting, adding another instance of the Setting to the response's ItemList            response.ItemList.Add(new Setting            {                Name = SettingNames.SecondProviderSetting,                DefaultValue = DefaultSettings()[SettingNames.SecondProviderSetting],                CurrentValue = secondSetting,                Description = SettingDescriptors().FirstOrDefault(x => x.Name == SettingNames.SecondProviderSetting)?.Description            });
            // Return the response using an awaited task            return await Task.FromResult(response);        }
        /// <summary>        /// We can get something from the web        /// </summary>        /// <param name="request"></param>        /// <returns></returns>        public async Task<CustomObjectResponse> GetDataAsync(GetSomethingRequest request)        {            // A service GET is going to retrieve some data from some other source and populate a response            // In this case we have a CustomObjectResponse that contains an ItemList of CustomDataObjects            // For the sake of demonstration a response has been populated with constants and returned to the caller            return await Task.FromResult(new CustomObjectResponse            {                ItemList = new List<CustomDataObject>                {                    new CustomDataObject                    {                        AnotherPropertyThatsAnInt = 9999,                        ChildrenObjects = new List<CustomChildObject>                        {                            new CustomChildObject                            {                                DateTime = DateTime.Now,                                Int = 007,                                String = "James Bond"                            },                            new CustomChildObject                            {                                DateTime = DateTime.Today,                                Int = 006,                                String = "Alec Trevelyn"                            }                        },                        OneOfYourObjects = "MI6"                    }                }            });        }    }}
Updating the Service Host
Section titled “Updating the Service Host”The final place we need to stub out our new contract method is within the DistributedService itself. This is also where we want to add our two validatiors we created earlier.
Add a new method stub for GetLoanDecisionAsync() and add two new entity validators so that your class now looks like the one below
DistributedService.cs
using Alkami.Data.Validations;using Alkami.MicroServices.Settings.ProviderBasedService;using System;using System.Threading.Tasks;using USBFI.MS.FirstService.Contracts;using USBFI.MS.FirstService.Contracts.Requests;using USBFI.MS.FirstService.Contracts.Responses;using USBFI.MS.FirstService.Data.Validations;
namespace USBFI.MS.FirstService.Service.Host{    public class DistributedService : ProviderBasedService<IFirstServiceServiceContract, ServiceImp>, IFirstServiceServiceContract    {        private IFirstServiceServiceContract _serviceContract; //This doesn't need to be injected, since the service will ALWAYS run the instance        private readonly string _providerName;        private readonly string _providerType;
        /// <summary>        /// The new provider based service will require additional parameters during construction        /// </summary>        /// <param name="friendlyName"></param>        /// <param name="providerName"></param>        /// <param name="providerType"></param>        public DistributedService(string friendlyName, string providerName, string providerType) : base(friendlyName, providerName, providerType)        {            _providerName = providerName;            _providerType = providerType;        }
        public void OnStart()        {            _serviceContract = new ServiceImp(_providerType, _providerName);
            // TODO: Add validators here.            EntityValidator.AddValidator(new AddOrUpdateSomethingRequestValidator());            EntityValidator.AddValidator(new GetSomethingRequestValidator());            EntityValidator.AddValidator(new CustomDataObjectFilterValidator());            EntityValidator.AddValidator(new CustomDataObjectValidator());
            Alkami.Broker.ZeroMq.Setup.PublishUsingZeroMqLocally();            Alkami.Broker.ZeroMq.Setup.SubscribeUsingZeroMqLocally(_serviceCancellationToken.Token);            Alkami.Broker.App.Subscription.InitializeSubscriber();
            base.Start();        }
        public void OnStop(TimeSpan fromSeconds)        {            base.Stop(fromSeconds);        }
        /// <inheritdoc />        public Task<SettingsResponse> GetSettingsAsync(GetSettingsRequest request)        {            return _serviceContract.GetSettingsAsync(request);        }
        /// <inheritdoc />        public Task<CustomObjectResponse> GetDataAsync(GetSomethingRequest request)        {            return _serviceContract.GetDataAsync(request);        }
        public Task<LoanDecisionResponse> GetLoanDecisionAsync(GetLoanDecisionRequest request)        {            return _serviceContract.GetLoanDecisionAsync(request);        }    }}
Testing the New Loan Decision Feature
Section titled “Testing the New Loan Decision Feature”We have all the implementation details in place! Now it’s time to test our new contract method using the Micro Service Tester.
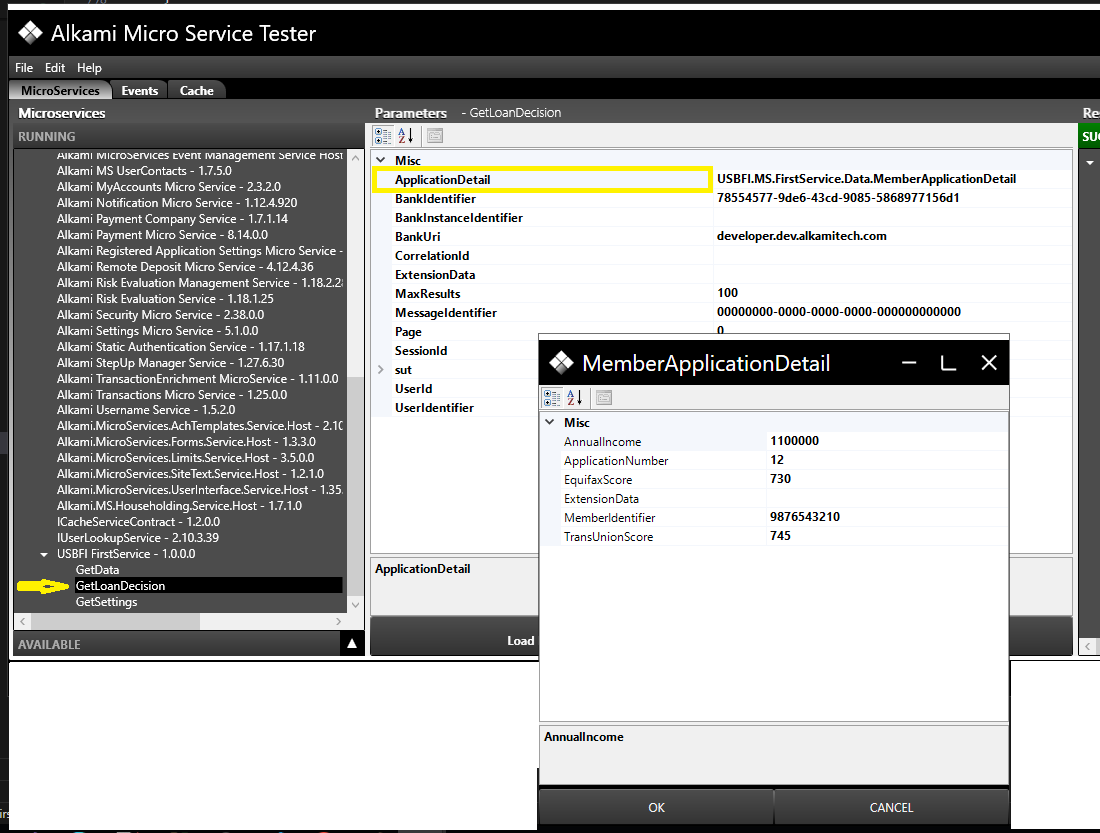
Start the service in Visual Studio and select the new GetLoanDecision contract method.
Open the ApplicationDetail property and populate it’s members with some test data.
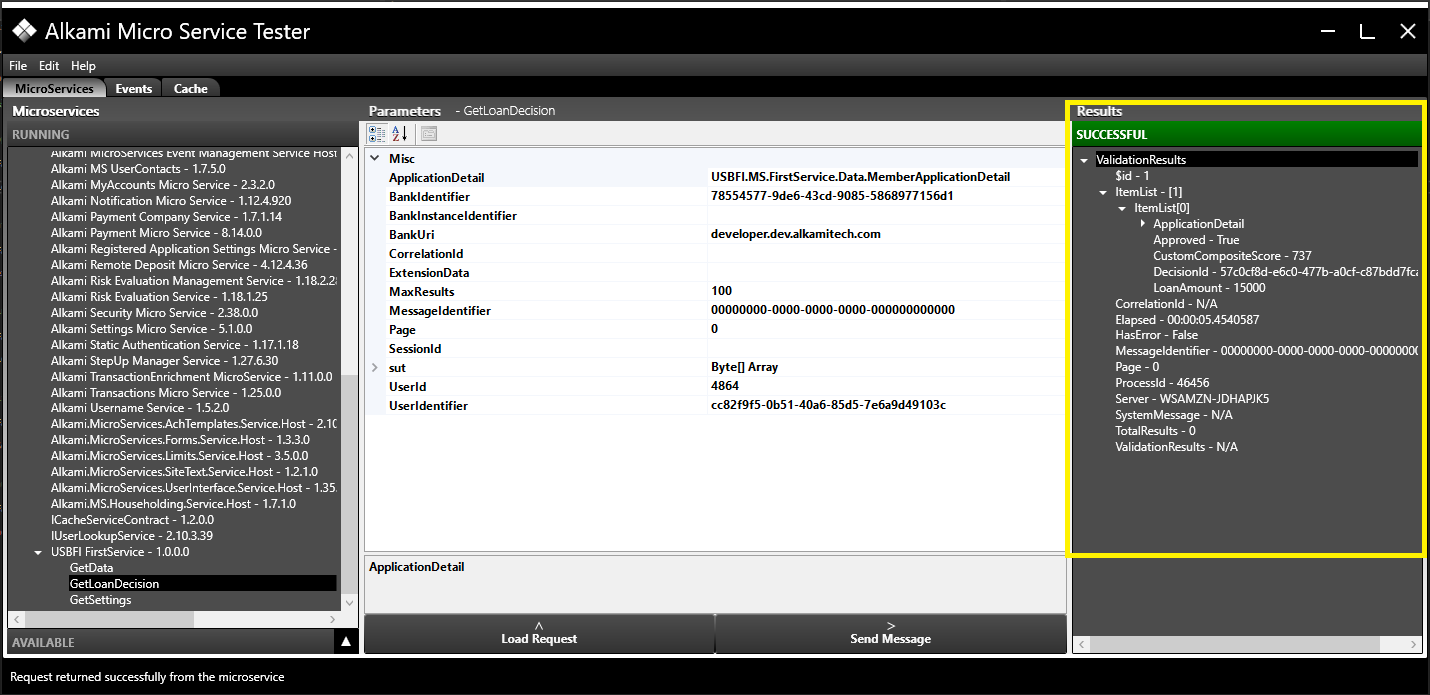
Click OK and then click Send Message
The response will have our new decision details! This data was approved for a $15000 loan, congrats!
Identifying Additional Settings
Section titled “Identifying Additional Settings”It’s always good to look at your implementation and determine if there are additional variables that can be converted to configurable settings.
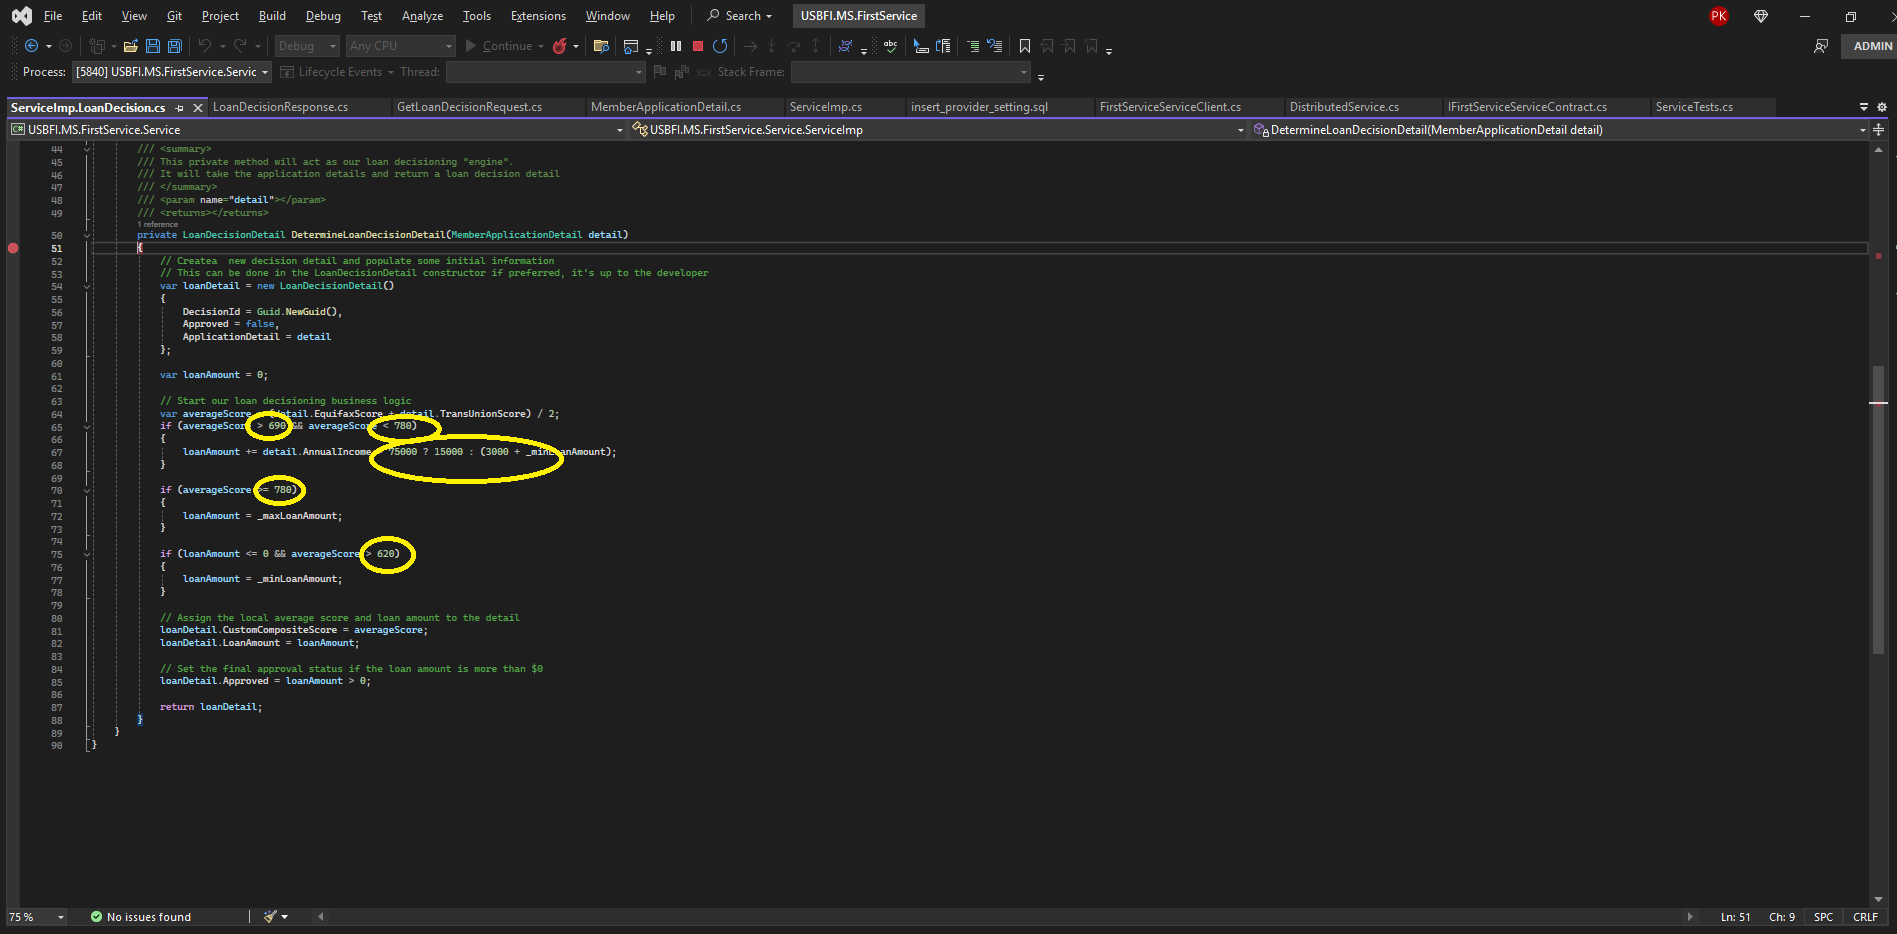
I’ve purposefully left some “magic numbers” in the example ServiceImp.LoanDecision.cs partial class and I’ve circled them below in the screen shot.
These are great candidates for configurable settings and can be added right along with the min and max settings.
